Thought I'd share the following posts and tutorials to showcase the different ways of attaching hair:
1. Owlishly
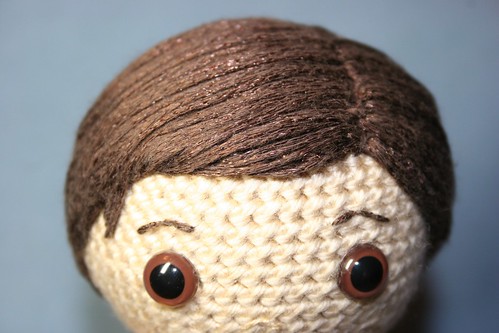
Method: Create a wig cap (which is basically crocheting half of the head in the hair colour), then embroider hair on top of it strand by strand to style the look.
This is by far the most intense method, but just look at the results! So natural and so beautiful. It's worth all the extra work I think. Just check out some of her work if you are still unsure of the time required.
Unfortunately the yarn she used (Bernat Cool Crochet in Chocolate) is discontinued :(
2. EssHaych
.JPG)
Method: Latch hook style, adding hair one strand at a time directly onto head.
It looks pretty time consuming too, but perhaps a good one if you want a fuzzier look. Another look at this method can be found on Ana Paula's Amigurumi Patterns & Random Cuteness.
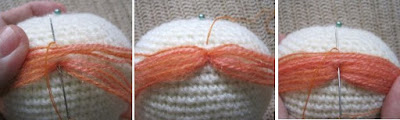
3. NeedleNoodles

Method: Making a fringe and then sewing that to the head.
As the author suggested, it's easier and faster than doing it strand by strand. I've tried it by winding the hair around a cardboard and it seems to work just as well, if you don't have the fancy tool.
Updated Sep 28: another tutorial on Woolly Toons
4. K and J Dolls Blog
Method: A blend of #2 and #3. Using the cardboard method to create equal length hair strands, then grabbing multiple strands together and sewing the bunch directly onto the head.
Other tips I've found:
-K and J Dolls Blog: you can do the top half of the head in the hair colour if you don't want to create a wig.
-MyGurumi: use fuzzy / eyelash yarn to create hair quickly, or try doing bobbles.
-By Hook, By Hand: A Flickr step by step photo tutorial on how to create wigs
-Xanadoodle: Here's a fun explanation on how to create different hairstyles using Star Trek characters as examples.
-Regardless of the method you use, you almost always start with determining your amigurumi's hairline.
-Get some thinner yarn to make a more natural look.
-Thick curly hair can be done by making a chain, then adding a longer stitch (hdc instead of sc for example) at regular intervals, or by crocheting increases all the way through. The yarn will naturally curl. For thinner curly hair, you may try unwinding your yarn into its individual strands.
Looking forward to trying some of these hair styles.


1 comments:
so thanksssssssss for sharing this help !! beautiful !! Leelou from France
Post a Comment
Thanks for taking the time to write a comment.